
單張圖片沒有「溢出內容需要捲動」的需求。放大後只需要:
這正好是 CSS transform: scale3d() + translate3d() 擅長的事。
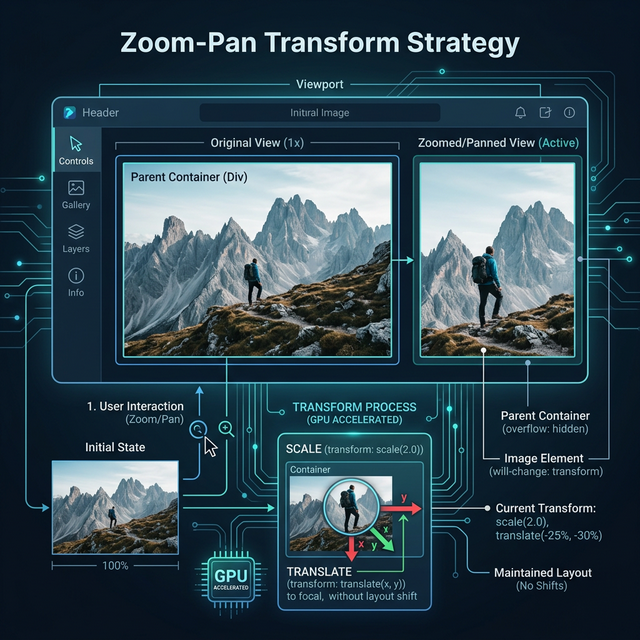
transform: scale3d(2, 2, 1) translate3d(100px, 50px, 0);
使用 scale3d / translate3d(而非 scale / translate)會觸發 GPU 合成層(compositing layer):
相比之下,若改用 width/height 放大圖片,每一幀都要重新排版,效能極差。
will-change: transform;
在 directive 的 ngOnInit 中提前設定,告訴瀏覽器「這個元素即將被 transform」:
瀏覽器預先建立 GPU 合成層
避免首次 pinch 時才建立,導致卡頓(jank)
注意:不要濫用,每個合成層都佔用 GPU 記憶體
MDN: will-change
圖片是一個固定尺寸的元素:
┌─────────────────┐
│                 │
│     <img>       │  ← 沒有子元素、沒有溢出內容
│                 │
└─────────────────┘
「畫面外的區域」不是 overflow(溢出),而是 transform 後的視覺位移。用 translate3d 平移就能看到任何區域,不需要 scrollbar。
對比長文件(如報表):
┌─────────────────┐
│  第 1 頁內容     │  ← 可見區域
├─────────────────┤
│  第 2 頁內容     │  ← overflow,需要捲動才能看到
├─────────────────┤
│  第 3 頁內容     │
└─────────────────┘
長文件放大後,需要捲動到所有頁面,這是 transform 策略做不到的(transform 只移動整個元素,不處理內部溢出)。
/* 未放大時 */
touch-action: manipulation;  /* 允許原生捲動和 pinch,禁用 double-tap-to-zoom */

/* 放大後 */
touch-action: none;          /* 全部手勢由 Hammer JS 處理 */
放大後設為 none 的原因:
translate3d 平移衝突未放大時設為 manipulation:
允許頁面正常捲動(如 照片燈箱元件 裡的 Swiper 左右滑動)
禁用瀏覽器的 double-tap-to-zoom,避免和 tap 手勢衝突
MDN: touch-action
max_pos_x = Math.ceil(((scale - 1) * elm.clientWidth) / 2);
max_pos_y = Math.ceil(((scale - 1) * elm.clientHeight) / 2);
為什麼是 (scale - 1) * size / 2:
scale = 2, 元素寬度 = 400px

放大後視覺寬度 = 800px
超出畫面的部分 = 800 - 400 = 400px
因為 transform-origin 預設在中心,左右各超出 200px

最大平移量 = 400 × (2-1) / 2 = 200px
這確保平移不會超出圖片邊緣,看到空白區域。
const scheduleUpdate = () => {
  if (!this._rafId) {
    this._rafId = requestAnimationFrame(applyTransform);
  }
};
手指在螢幕上移動時,Hammer 每秒可能觸發數十到上百次事件。如果每次都直接更新 DOM:
用 requestAnimationFrame(rAF)確保每幀只更新一次。
CSS zoom 會改變 layout,圖片放大後會推開周圍元素(如 Swiper 的其他 slide),導致版面錯亂。transform 不影響 layout,圖片在文件流中的位置和大小不變,只是視覺上放大。
transform 能做到流暢的 60fps 動畫| 主題 | 資源 |
|---|---|
| 瀏覽器渲染流程 | Inside look at modern web browser (Part 3) |
| 合成層原理 | Compositing in Blink and WebKit |
| 觸控事件全貌 | Touch Events - W3C |
| HammerJS | hammerjs.github.io |
| Chrome DevTools Layers | Layers panel — 可視化合成層 |